Beginner's guide to painting 15mm WWII figures
Part 2
Priming and Painting
To prime the figures I’ve used my Premi-Air G35 airbrush and Vallejo Model Air’s 71057 Black. I’m new to airbrushing, but love the smooth finish it gives, the quick drying time and the ease by which you can get into those hard to reach nooks and crannies. If you don’t have an airbrush a simple black aerosol primer will do the job. Just remember not to apply the coats too heavily. Start spraying before and after the figures to prevent a build up of paint. Alternatively, a couple of watered down coats of regular black paint applied with a large brush will also do the job. Just allow plenty of time to dry.
I always start with faces and hands. I don’t know why, it just seems to make sense to apply the lightest colour first and work outwards. I use a slightly watered down Vallejo 021 Medium Fleshtone which I apply liberally from one end to the other. When I’ve complete, I start all over again. This allows 2 thin coats of paint to be applied without obscuring any of the detail. And by the time you’ve started again, the paint will have dried a little and will cover much more effectively. You’ll see that I’ve not taken alot of care on this. The light colour means that it can
easily be tidied up later when I paint the darker uniforms.
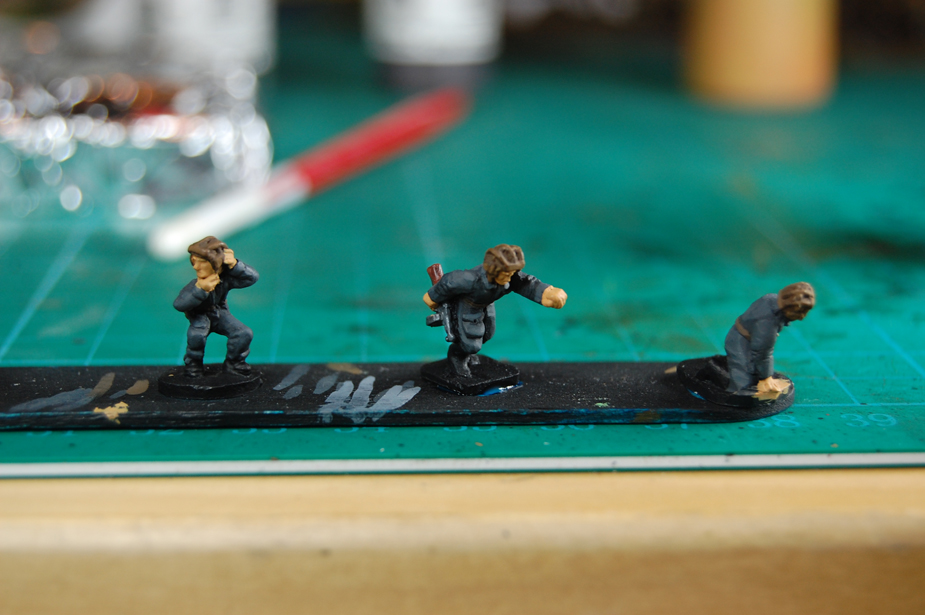
Looking at the Osprey books, I’ve just realised that both nationalities tankers were dressed in black or, in the case of the Russians, slate grey.
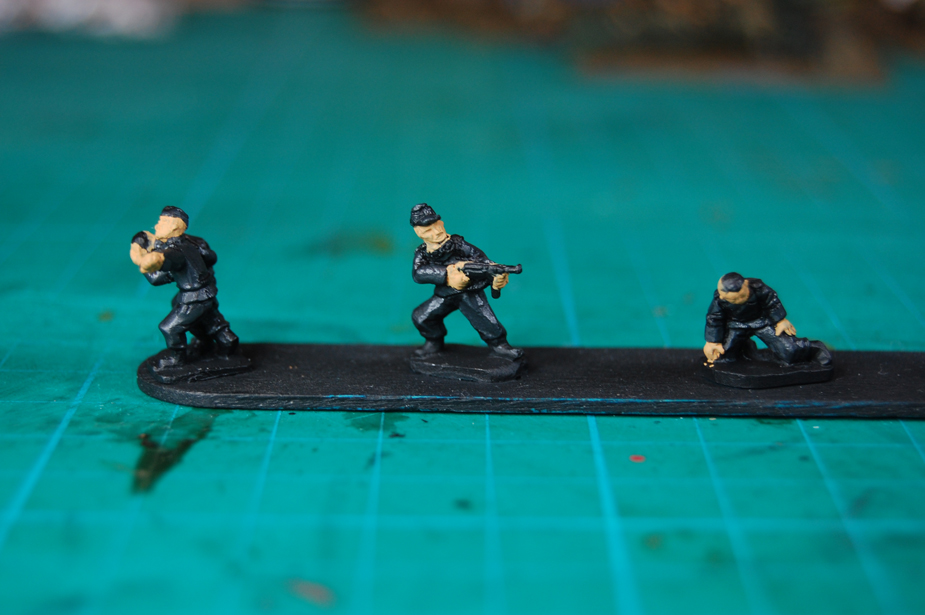
To represent this, I’ve decided to paint the highlights of the German figures with 167 German Grey whilst the Russians receive a thin coat of 168 Black Grey over their one-piece coveralls.
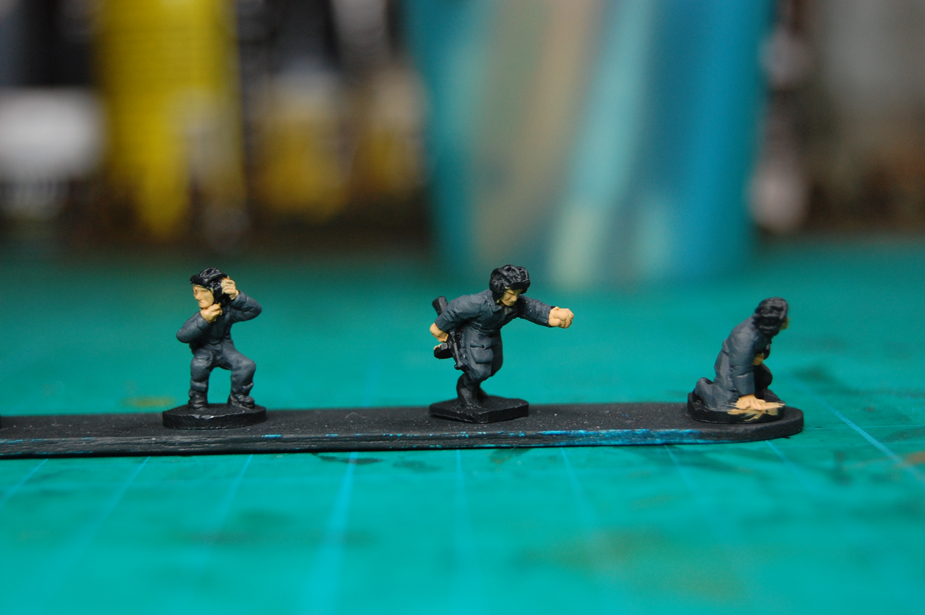
If we stay with the Russians for a moment, I’ve added 2 successive coats of Black Grey mixed with an increasing quantity of white to highlight shoulders, knees, elbows, collars and straps. I’ve kept the consistency of the paint like milk to prevent too stark a contrast (it’s also easier to remove if you make a cock up of it!). This gives the coveralls a little more depth. As an aside, I’m finding that the lolly-pop is useful for soaking up excess paint on the brush, but is a little more uncomfortable to hold that I would like (I’ve dropped it at least once scattering figures across my desk).
I’ll repeat the same process for the brown padded helmet. I’ll start with 149 Chocolate brown and paint the highlights 143 Flat Earth.
I’ve adopted a similar approach with the Germans, adding a smidgen of white to the German Grey base highlight. Painting black realistically is harder than I first thought. Perhaps I’d have been better off painting them German grey to start off with!
I’ll paint the M1943 peaked field cap field-grey and highlight with the addition of a little white whilst still wet.
I’m not going to worry too much about shading any more as I’ll be adding a coat of Army Painter’s Quickshade dip to blend colours and provide a layer of protective varnish later.
Details
On the Russians, belts and holsters receive a coat of 147 Leather. The boots are touched up in the original black. The PPsh.41 is painted 160 Neutral Grey with the stock 139 Mahogany Brown. I prefer not to paint my guns in metallic colours, only my lads’ bayonets get this treatment! This is a personal choice. After discovering 135 Beige Brown, I’m not altogether content with 139 Mahogany Brown for rifles, but since the rest of my Russians have the same colour I’m retaining it for consistencies sake.
I’ll cover the gun and stock with a coat of Citadel paint’s Badab Black wash, letting it soak into the details and add definition between the hand and weapon.
Last, but not least, I check the figure for any obvious imperfections, retouch the skin tone and we’re done for the moment.
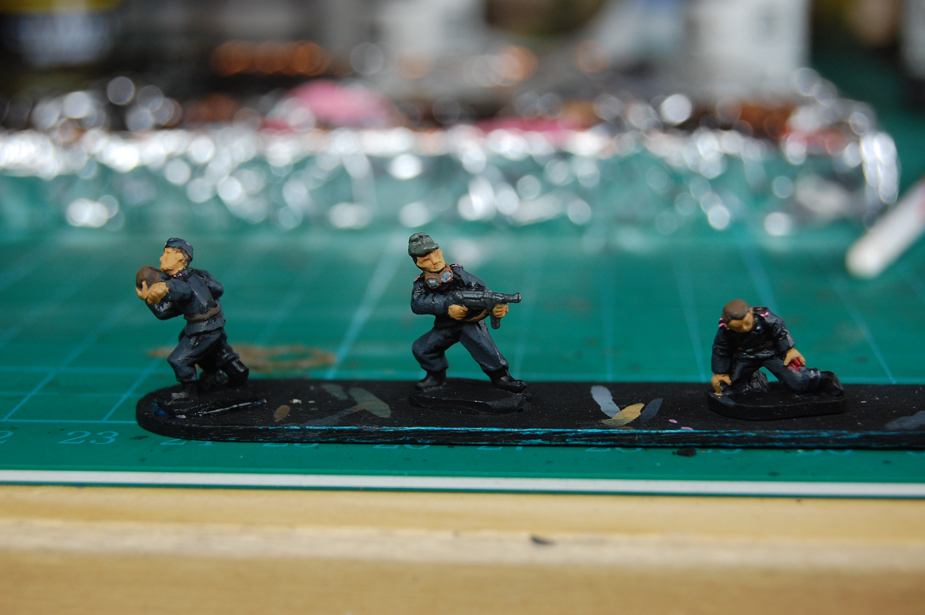
As you would expect, the Germans require a little more work. I’m not too happy with the high contrast between the black base coat and the dark grey highlights. I’m hoping Army Painter’s Dark Tone dip will smooth some of this out. The MP 40 will be painted Neutral Grey, washed black. The German with the sidecap wears a badge on his jacket which I’m going to paint as the Tank Battle Badge. To break the black up a little, I’ll paint goggles, belts and holsters leather brown. I’ve highlighted the goggles 135 Beige Brown and used the same colour for the strap. The ‘glass’ is 160 Neutral Grey with White blended whilst wet. Hair has been painted 150 German Camouflage Black Brown and highlighted with 145 German Camouflage Medium Brown. I found my model German’s hair a poorly moulded, so I’ve exaggerated the parting with the highlights.
I’m not one for too much gore on figures, but I will add a trickle of blood on the chap being carried away by his crewmate and to the fallen figure to reflect a cut to the head and injury from small arms fire respectively.
Finally, as I’ve not got a steady hand, I’m reduced to indicated cap badges, rank insignia and waffenferbe (German: “corps [or troop-function] color”) with white dots and pink lines respectively. To complete the waffenferbe, I painted the whole piece pink and put a black line through it. Depending upon the model, I can sometimes paint the edge easily, but where definition is a problem I find block painting an oblong helpful.
 |